Saturday, September 15, 2012

Linux LVM - Creating LV and mounting it


We had created a VG already here, we are going to use that VG to create some LVs or filesystems on it.

At first going to look for the VG size and free space available, vgdisplay and vgs commands will do that for us,


Here we find that only one VG is available on the server. If there are many VGs and if you want the details of the particular VG, you can use vgs or vgdisplay .

Currently i do not have any LVs available on the server apart from the root / filesystem.


We also have other useful commands to verify PV, VG and LV (pvscan ; vgscan ; lvscan), just for additional information.


Ooops ok.. thanks for your patience, lets start creating LVs.

There are several methods of creating a LV, which will be discussed later. The most commonly used default method of creating LV as below,

Syntax:
lvcreate -L -n

Example:
lvcreate -L 100M -n newLV1 newVG

So, now the LV is created successfully.

To verify,


So now we had created an LV successfully and verified.

Now the next step is to format the filesystem before mounting it to a mount point.

The device can formated in many different types, latest redhat/centOS versions has ext4.

Command used is mkfs.ext4.

The version which i use, do not have ext4 type format. So we are going to format it with ext3.


To format the LV, we need to know the complete path of the LV device created. Which can be seen in lvdisplay and lvscan outputs from the previous and below screen shots in this post.


Note the "newLV1" linked to "/dev/mapper/newVG-newLV1" which will be the one will be used as the device path for the mount point, even if you use /dev/newVG/newLV1. This can be identified in "mount -l" output after mounting it to a mount point.

Current "mount -l'  output


Also the formatted filesystem type will also be verified with the "mount -l" command only after mounting it to a mount point.

Lets start formatting the LV device and mount it to a mount point.

Syntax:
mkfs.ext3

Example:
mkfs.ext3 /dev/newVG/newLV1


Create a mount point, make a directory which is going to be a mountpoint for this LV. Which can be any path and located any where in the server.

I am going to create it in / directory itself. Which is /newFS.

mkdir /newFS


Mounting it to the created directory, which is called as the mount point.

mount /dev/newVG/newLV1 /newFS


Verify with df -h before and after mounting the filesystem, also with "mount -l".


After Mounting, from "mount -l" outptut.
/dev/mapper/newVG-newLV1 on /newFS type ext3 (rw)

So now successfully mounted the created filesystem. One last and final step is to we need to add this mount point and filesystem details in /etc/fstab for automount while booting.

Verifying for the current /etc/fstab entry.


Edit the /etc/fstab file and add the new mountpoint as below.


That ends the entire LVM.

Quick Recap of complete LVM


Friday, September 14, 2012

Linux LVM - Creating VG


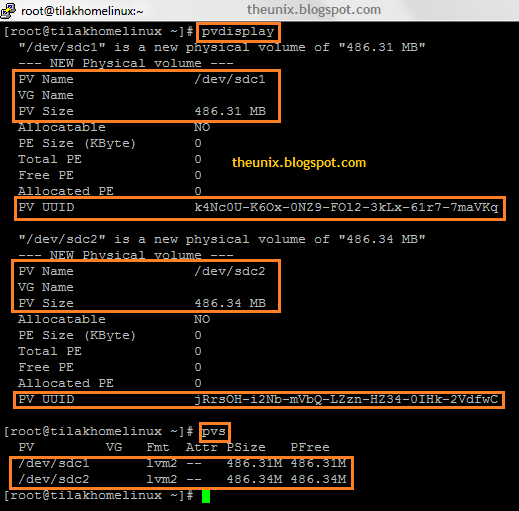
For creating a VG we need free PVs, i am going to use the PVs created from my previous post,

Below are the PVs going to be used for the new VG, make a note of the attributes on the below output,


 1. Command to create VG with above PVs /dev/sdc1 and /dev/sdc2,

vgcreate
Example: vgcreate newVG /dev/sdc1

Here i want 2 devices to be added to the VG,

vgcreate newVG /dev/sdc1 /dev/sdc2


2. Verify the created VG,

with pvs and pvdisplay command,


with vgs and vgdisplay,


Linux LVM - Creating PVs

Linux LVM - Creating PVs

How to create Physical volume (PV)?

Before creating a PV verify if it is formatted with appropriate partition's system id, click here for the previous post how to format with Linux LVM partion id?

We are going to create a PV which is based on the disk formatted on my previous post.

Created 2 partitions on /dev/sdc. To display it use fdisk -l /dev/sdc


1. Execute pvdisplay or pvs commands to check and make a note of the previously created physical volumes,

I had no PV created already, so nothing displayed below,


2. So here is the simple command to create the PVs, each partitions mentioned below are 500MB.

pvcreate /dev/sdc1
pvcreate /dev/sdc2


3. Verifying the created PVs with pvdisplay and pvs commands,

PVs created successfully,


For creating VG click here.

Format a new disk for Linux LVM

Format a new disk in Linux LVM

1. Find the new disk from fdisk -l,


2. Format the disk using fdisk command. I am going to format the device /dev/sdc with 2 partitions.


Used the below options,

For first partition /dev/sdc1

a) Command (m for help): n  -----> New Partition

b) Command action
   e   extended
   p   primary partition (1-4)
p -----> Primary Partition

c) Partition number (1-4): 1
First cylinder (1-130, default 1):
Using default value 1
Last cylinder or +size or +sizeM or +sizeK (1-130, default 130): +500M -----> last cylinder we have a option by mentioning the size and create a partition instead of end cylinder number.

d) Command (m for help): t ----> To toggle the system type of the partition, here the filesystem type we need is Linux LVM
Selected partition 1
Hex code (type L to list codes): 8e
Changed system type of partition 1 to 8e (Linux LVM)
  
e) Command (m for help): p

Disk /dev/sdc: 1073 MB, 1073741824 bytes
255 heads, 63 sectors/track, 130 cylinders
Units = cylinders of 16065 * 512 = 8225280 bytes

Device Boot      Start         End      Blocks   Id  System
/dev/sdc1               1          62      497983+  8e  Linux LVM
For Second Partition,

Command (m for help): n
Command action
   e   extended
   p   primary partition (1-4)
p
Partition number (1-4): 2
First cylinder (63-130, default 63):
Using default value 63
Last cylinder or +size or +sizeM or +sizeK (63-130, default 130): +500M

Command (m for help): t
Partition number (1-4): 2
Hex code (type L to list codes): 8e
Changed system type of partition 2 to 8e (Linux LVM)

Command (m for help): p

Disk /dev/sdc: 1073 MB, 1073741824 bytes
255 heads, 63 sectors/track, 130 cylinders
Units = cylinders of 16065 * 512 = 8225280 bytes

   Device Boot      Start         End      Blocks   Id  System
/dev/sdc1               1          62      497983+  8e  Linux LVM
/dev/sdc2              63         124      498015   8e  Linux LVM


Command (m for help): w -----> To write all the modification at the end.
The partition table has been altered!

Calling ioctl() to re-read partition table.
Syncing disks.
[root@tilakhomelinux ~]# partprobe -----> informs the operating system kernel of partition table changes, by requesting that the operating system re-read the partition table.

Scan and Detect a new disk added from VMware to a Linux VM.

Scan and Detect a new disk added from VMware to a Linux VM

1. Before scanning a VMware SCSI disk, make a note of an already available disks on the server with "fdisk -l" command and the LUN ids from "cat /proc/scsi/scsi" file.


 2. Check how many scsi hostid's present in "ls -l /sys/class/scsi_host". I had only one scsi hostid (host0) present in the server as below,


3. Now lets scan and detect the VMware Scsi disk assigned to this server with the below command,

echo "- - -" > /sys/class/scsi_host/hostx/scan - where x is the hostid from the "ls -l /sys/class/scsi_host" output.

Had executed the below since i had only one hostid "host0".

echo "- - -" > /sys/class/scsi_host/host0/scan


4. For the servers who have more scsi host id's, execute the below forloop script to scan the new disks.

"for a in `ls /sys/class/scsi_host`; do echo $a; echo "- - -" > /sys/class/scsi_host/$a/scan; done"

5. Now verify the new disk on the server with "fdisk -l" command and the LUN ids from "cat /proc/scsi/scsi" file.


6. At next we will format the new disks in Linux LVM and create a FileSystem. 

Adding an additional disk in VMware for Linux VM

Adding an additional disk in VMware for Linux VM

1. Right click on the VM which you need to add a disk and goto settings from your VMware Workstation.

You will get the below window,


2. Make a note of already assigned disk to the VM. And click on Add.

3. Select Hardisk and click on next,


4. Select any one of the option from below, which ever suits the environment. I prefer the first one since it is my home machine.


5. Since my VM is currently active and i wanted to add the disk on the fly, i got below option only with SCSI disk.


6. Mention the required size of the new disk, Allocate all disk space should be enabled if it going to be a production environment, else the disk will grow by the usage till it reaches the required size.


7. Specify the name of the new disk file to be created and on which path or partition where you got the required disk space. And click on Finish.


8. We are done now, verify the disk is added here on the below box and click on OK.


9. Now click here for how to get the disk on the VM or Server.

Thursday, September 13, 2012

Linux - Booting Process


Linux - Booting Process

After Powering On a Linux Machine,

1. BIOS

  • BIOS stands for Basic Input/Output System
  • Performs some system integrity checks
  • Searches, loads, and executes the boot loader program.
  • It looks for boot loader in floppy, cd-rom, or hard drive. You can press a key (typically F12 of F2, but it depends on your system) during the BIOS startup to change the boot sequence.
  • Once the boot loader program is detected and loaded into the memory, BIOS gives the control to it.
  • So, in simple terms BIOS loads and executes the MBR boot loader.

2. MBR

  • MBR stands for Master Boot Record.
  • It is located in the 1st sector of the bootable disk. Typically /dev/hda, or /dev/sda
  • MBR is less than 512 bytes in size. This has three components 1) primary boot loader info in 1st 446 bytes 2) partition table info in next 64 bytes 3) mbr validation check in last 2 bytes.
  • It contains information about GRUB (or LILO in old systems).
  • So, in simple terms MBR loads and executes the GRUB boot loader.

3. GRUB

  • GRUB stands for Grand Unified Bootloader.
  • If you have multiple kernel images installed on your system, you can choose which one to be executed.
  • GRUB displays a splash screen, waits for few seconds, if you don’t enter anything, it loads the default kernel image as specified in the grub configuration file.
  • GRUB has the knowledge of the filesystem (the older Linux loader LILO didn’t understand filesystem).
  • Grub configuration file is /boot/grub/grub.conf (/etc/grub.conf is a link to this). The following is sample grub.conf of CentOS.
  •  
    #boot=/dev/sda
    default=0
    timeout=5
    splashimage=(hd0,0)/boot/grub/splash.xpm.gz
    hiddenmenu
    title CentOS (2.6.18-194.el5PAE)
              root (hd0,0)
              kernel /boot/vmlinuz-2.6.18-194.el5PAE ro root=LABEL=/
              initrd /boot/initrd-2.6.18-194.el5PAE.img
     
  • As you notice from the above info, it contains kernel and initrd image.
  • So, in simple terms GRUB just loads and executes Kernel and initrd images.

4. Kernel

  • Mounts the root file system as specified in the “root=” in grub.conf
  • Kernel executes the /sbin/init program
  • Since init was the 1st program to be executed by Linux Kernel, it has the process id (PID) of 1. Do a ‘ps -ef | grep init’ and check the pid.
  • initrd stands for Initial RAM Disk.
  • initrd is used by kernel as temporary root file system until kernel is booted and the real root file system is mounted. It also contains necessary drivers compiled inside, which helps it to access the hard drive partitions, and other hardware.

5. Init

  • Looks at the /etc/inittab file to decide the Linux run level.
  • Following are the available run levels
    • 0 – halt
    • 1 – Single user mode
    • 2 – Multiuser, without NFS
    • 3 – Full multiuser mode
    • 4 – unused
    • 5 – X11
    • 6 – reboot
  • Init identifies the default initlevel from /etc/inittab and uses that to load all appropriate program.
  • Execute ‘grep initdefault /etc/inittab’ on your system to identify the default run level
  • If you want to get into trouble, you can set the default run level to 0 or 6. Since you know what 0 and 6 means, probably you might not do that.
  • Typically you would set the default run level to either 3 or 5.

6. Runlevel programs

  • When the Linux system is booting up, you might see various services getting started. For example, it might say “starting sendmail …. OK”. Those are the runlevel programs, executed from the run level directory as defined by your run level.
  • Depending on your default init level setting, the system will execute the programs from one of the following directories.
    • Run level 0 – /etc/rc.d/rc0.d/
    • Run level 1 – /etc/rc.d/rc1.d/
    • Run level 2 – /etc/rc.d/rc2.d/
    • Run level 3 – /etc/rc.d/rc3.d/
    • Run level 4 – /etc/rc.d/rc4.d/
    • Run level 5 – /etc/rc.d/rc5.d/
    • Run level 6 – /etc/rc.d/rc6.d/
  • Please note that there are also symbolic links available for these directory under /etc directly. So, /etc/rc0.d is linked to /etc/rc.d/rc0.d.
  • Under the /etc/rc.d/rc*.d/ directories, you would see programs that start with S and K.
  • Programs starts with S are used during startup. S for startup.
  • Programs starts with K are used during shutdown. K for kill.
  • There are numbers right next to S and K in the program names. Those are the sequence number in which the programs should be started or killed.
  • For example, S12syslog is to start the syslog deamon, which has the sequence number of 12. S80sendmail is to start the sendmail daemon, which has the sequence number of 80. So, syslog program will be started before sendmail.

Linux - Runlevel and Init process

Linux - Runlevel and Init process

Different Linux systems can be used in many ways. This is the main idea behind operating different services at different operating levels. For example, the Graphical User Interface can only be run if the system is running the X-server; multiuser operation is only possible if the system is in a multiuser state or mode, such as having networking available. These are the higher states of the system, and sometimes you may want to operate at a lower level, say, in the single user mode or the command line mode.
Such levels are important for different operations, such as for fixing file or disk corruption problems, or for the server to operate in a run level where the X-session is not required. In such cases having services running that depend on higher levels of operation, makes no sense, since they will hamper the operation of the entire system.
Each service is assigned to start whenever its run level is reached. Therefore, when you ensure the startup process is orderly, and you change the mode of the machine, you do not need to bother about which service to manually start or stop.
The main run-levels that a system could use are:

RunLevel
Target
Notes
0
runlevel0.target, poweroff.target
Halt the system
1
runlevel1.target,  rescue.target
Single user mode
2, 4
runlevel2.target, runlevel4.target, multi-user.target
User-defined/Site-specific runlevels. By default, identical to 3
3
runlevel3.target,multi-user.target
Multi-user, non-graphical. Users can usually login via multiple consoles or via the network.
5
runlevel5.target, graphical.target
Multi-user, graphical. Usually has all the services of runlevel3 plus a graphical login - X11
6
runlevel6.target, reboot.target
Reboot
Emergency
emergency.target
Emergency shell
 
The system and service manager for Linux is now “systemd”. It provides a concept of “targets”, as in the table above. Although targets serve a similar purpose as runlevels, they act somewhat differently. Each target has a name instead of a number and serves a specific purpose. Some targets may be implemented after inheriting all the services of another target and adding more services to it.
Backward compatibility exists, so switching targets using familiar telinit RUNLEVEL command still works. On Fedora installs, runlevels 0, 1, 3, 5 and 6 have an exact mapping with specific systemd targets. However, user-defined runlevels such as 2 and 4 are not mapped that way. They are treated similar to runlevel 3, by default.
For using the user-defined levels 2 and 4, new systemd targets have to be defined that makes use of one of the existing runlevels as a base. Services that you want to enable have to be symlinked into that directory.
The most commonly used runlevels in a currently running linux box are 3 and 5. You can change runlevels in many ways.
A runlevel of 5 will take you to GUI enabled login prompt interface and desktop operations. Normally by default installation, this would take your to GNOME or KDE linux environment. A runlevel of 3 would boot your linux box to terminal mode (non-X) linux box and drop you to a terminal login prompt. Runlevels 0 and 6 are runlevels for halting or rebooting your linux respectively.
Although compatible with SysV and LSB init scripts, systemd:
  • Provides aggressive parallelization capabilities.
  • Offers on-demand starting of daemons.
  • Uses socket and D-Bus activation for starting services.
  • Keeps track of processes using Linux cgroups.
  • Maintains mount and automount points.
  • Supports snapshotting and restoring of the system state.
  • Implements an elaborate transactional dependency-based service control logic.
Systemd starts up and supervises the entire operation of the system. It is based on the notion of units. These are composed of a name, and a type as shown in the table above. There is a matching configuration file with the same name and type. For example, a unit avahi.service will have a configuration file with an identical name, and will be a unit that encapsulates the Avahi daemon. There are seven different types of units, namely, service, socket, device, mount, automount, target, and snapshot.
To introspect and or control the state of the system and service manager under systemd, the main tool or command is “systemctl”. When booting up, systemd activates the default.target. The job of the default.target is to activate the different services and other units by considering their dependencies. The ‘system.unit=’ command line option parses arguments to the kernel to override the unit to be activated. For example,
systemd.unit=rescue.target is a special target unit for setting up the base system and a rescue shell (similar to run level 1);
systemd.unit=emergency.target, is very similar to passing init=/bin/sh but with the option to boot the full system from there;
systemd.unit=multi-user.target for setting up a non-graphical multi-user system;
systemd.unit=graphical.target for setting up a graphical login screen.

Pages